Friday, October 8, 2010

Felted Wool Baby Mary Jane's


I crocheted these baby mary jane's with wool yarn, then felted them. I think they turned out so cute, and they were a quick project. They were given as a baby gift to a neighbor who just brought home twins. I found the pattern free online, but now can't remember where. Oops.

Wednesday, September 22, 2010

Rain Painting


The kids and I took advantage of a rainy day last month and did some rain painting.  I took our Crayola water colors and crushed the cakes into powder.  Then we sprinkled the colored powder onto water color paper and set them out in the rain.  I came to the conclusion that less is more.  Less paint powder needs less rain means less pooling.  Also, the globs of paint powder didn't dissolve well, so make sure the powder is not caked together.  It was a fun process, and the kids had great time (and so did I).  You never know how they are going to turn out.  Found on The Crafty Crow. 


Tuesday, August 10, 2010

Bleach Pen Art

I saw the technique of embellishing T's (or whatever) using a bleach pen About 6 or 7 years ago, but never tried it.  Now, it's all over blog land.  It took me a while, but I FINALLY tried it.  And I LOVE it!!  It's so fun, and addicting.  I've found that some fabric (or maybe it's the dye in the fabric) reacts completely different than another.  It's fun to see what's going to happen.  You use an bleach gel pen from Clorox, found in the laundry section by the Tide stain remover pen.  I've seen some people draw a design on the shirt using chalk, and then they draw over the chalk using the bleach pen.  Others just free hand it, or use paper cut outs as a guide.  Me?  I use contact paper to cut out my design, then stick it right on the shirt and  squeeze the gel on the spots I want to bleach.  The contact paper helps keep the bleach where I want it, to some extent (depending on bleed).  The possibilities are endless!  Here is a video tutorial on the basics of using a bleach pen from I am Momma- Hear Me Roar.
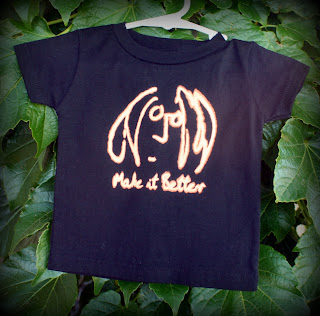
This was the first shirt I did.  It's John Lennon's self portrait and a line from his song "Hey Jude".  I L-O-V-E it!  It turned out just how I wanted.  The lettering is even a computer font based on J.L.'s handwriting.  Here is a close up up it.  It blurs out a little at the edge (which you should expect).  If you are looking for sharp, crisp edges, this is not the medium you want to use.  I left the bleach pen on this for about 6 hours.
It turned out so great, I promptly worked on the next one.  With the guitar, I was actually trying to bleach the guitar itself, not around it.  I cut the design out of contact paper, making sure to keep the circle and block to place back onto the guitar body.  I intended for the guitar to bleach out to a lighter color, but after about 30-60 SECONDS I saw the yellow halo appearing around the guitar.  I quickly pulled off the contact paper and washed out the bleach in the sink.  The effect I got on this one was unintended, but SO cool!  I'm not sure why it reacted this way.  It may have to do with the fact that it was a onesie I had dyed myself the previous day, and perhaps this particular dye (tulip brand) reacts differently.
My 5 year old loves guitars, so I used the guitar shape that I cut out of the contact paper from the green onesie.  I got one of his old shirts and placed the guitar in just the right spot.  Then I outlined the guitar shape with the bleach pen.  I then used a tooth pick to drag the bleach out away from the guitar to cause a sort of star effect.  This one took about 4-5 hours of bleaching.

Monday, August 2, 2010

A little change

I've decided to change this blog a little.  I used to post everything I wanted to make or do, but never what I actually made.  So, now I will post about things that I've made or done, and there is now a list over there -->
with links to the cool things I find and want to keep track of to make or do later. 

Wednesday, March 31, 2010

Thursday, March 25, 2010

Butterfly Quilt

I think this butterfly quilt is SO cute.  I've got a little butterfly theme going on in the girls room (so far just curtains, but slowly adding more).  This would be so cute on the beds, especially since I don't love what's on them now.

Printer ready Fabric

I was just thinking about this today, and just happened to come accross this tutorial.  I wasn't even looking, just got lucky.  This tutorial is a DYI for the solution to soak your fabric in, then you can run the fabric through your printer and the color will not wash out (according to the tut).  The best part, you can find everything you need at the grocery store, and she tells you what section to find them.  Did you know you can get Alum in the spice section.  I didn't!  There are so many possibilities, not just photos on bean bags.  The wheels are turning now.  The Idea Room found via Grosgrain.

Tuesday, March 9, 2010

Customized Family Tree

A new post!  You better sit down before you fall over.  I know it's been awhile since I posted anything.  I've tried to slow down at looking for new creative things, because I have a huge list of things I want to do already.  But I just couldn't pass up sharing this (and posting it so I can find it when I'm ready).  I've been thinking about a way to display a family tree in an artistic way for a long time.  There are A LOT of different ideas out there, but this post caught my interest more than most.  I love the teal and yellow one for a formal family tree to hang in a living room.  But I REALLY love the green dot tree with just the imediate family names on it.  It would be easily replicated.  How cute would this be with some pink blossom dots mixed in and hung in my girl's room!  I LOVE IT!  found on Li'l Magoolie (she's in NZ!).

Tuesday, January 12, 2010

Tights to Knee Highs


I just found the Ruffles and Stuff blog, thanks to my friend Tresa.  There is a cute and easy tutorial for making girls knee high socks from out grown tights.  I'm so excited to try this.  I think Miss A would look adorable in some!